How to Learn Automotive Upholstery Properly
Most people decide to learn upholstery after seeing a torn seat, a sagging roof lining, or cracked trim in a car they care about. That is usually where the real question begins – not just how to stitch material, but how to learn automotive upholstery in a way that produces clean, durable work rather than expensive mistakes.
Automotive upholstery is a specialist trade. It sits somewhere between trim work, material science, pattern making and patient hand skills. If you approach it like a weekend shortcut, the results usually show. If you approach it with proper workshop discipline, you can build useful skill over time and understand why experienced trimmers work the way they do.
How to learn automotive upholstery without bad habits
The first thing to understand is that automotive upholstery is not one skill. A seat panel repair, a full retrim, a hood lining replacement and a convertible soft-top installation all demand different techniques. Many beginners make the mistake of treating every job as simple sewing. In practice, success depends just as much on disassembly, pattern accuracy, foam shaping, material tension, adhesive control and refitting.
That is why your early learning matters. If you start by copying finished surfaces without understanding what sits underneath, you may produce something that looks acceptable for a few weeks but fails under heat, use and movement. Good upholstery work has to survive daily wear, sunlight, humidity and body weight. In Singapore, climate alone will expose weak glue lines, poor material choices and rushed preparation.
A better starting point is to think like a workshop specialist. Study how an interior is built, how the factory secured each section, where tension is meant to sit, and which components are decorative versus structural. That mindset saves time and avoids the common habit of forcing parts to fit after the fact.
Start with construction, not customisation
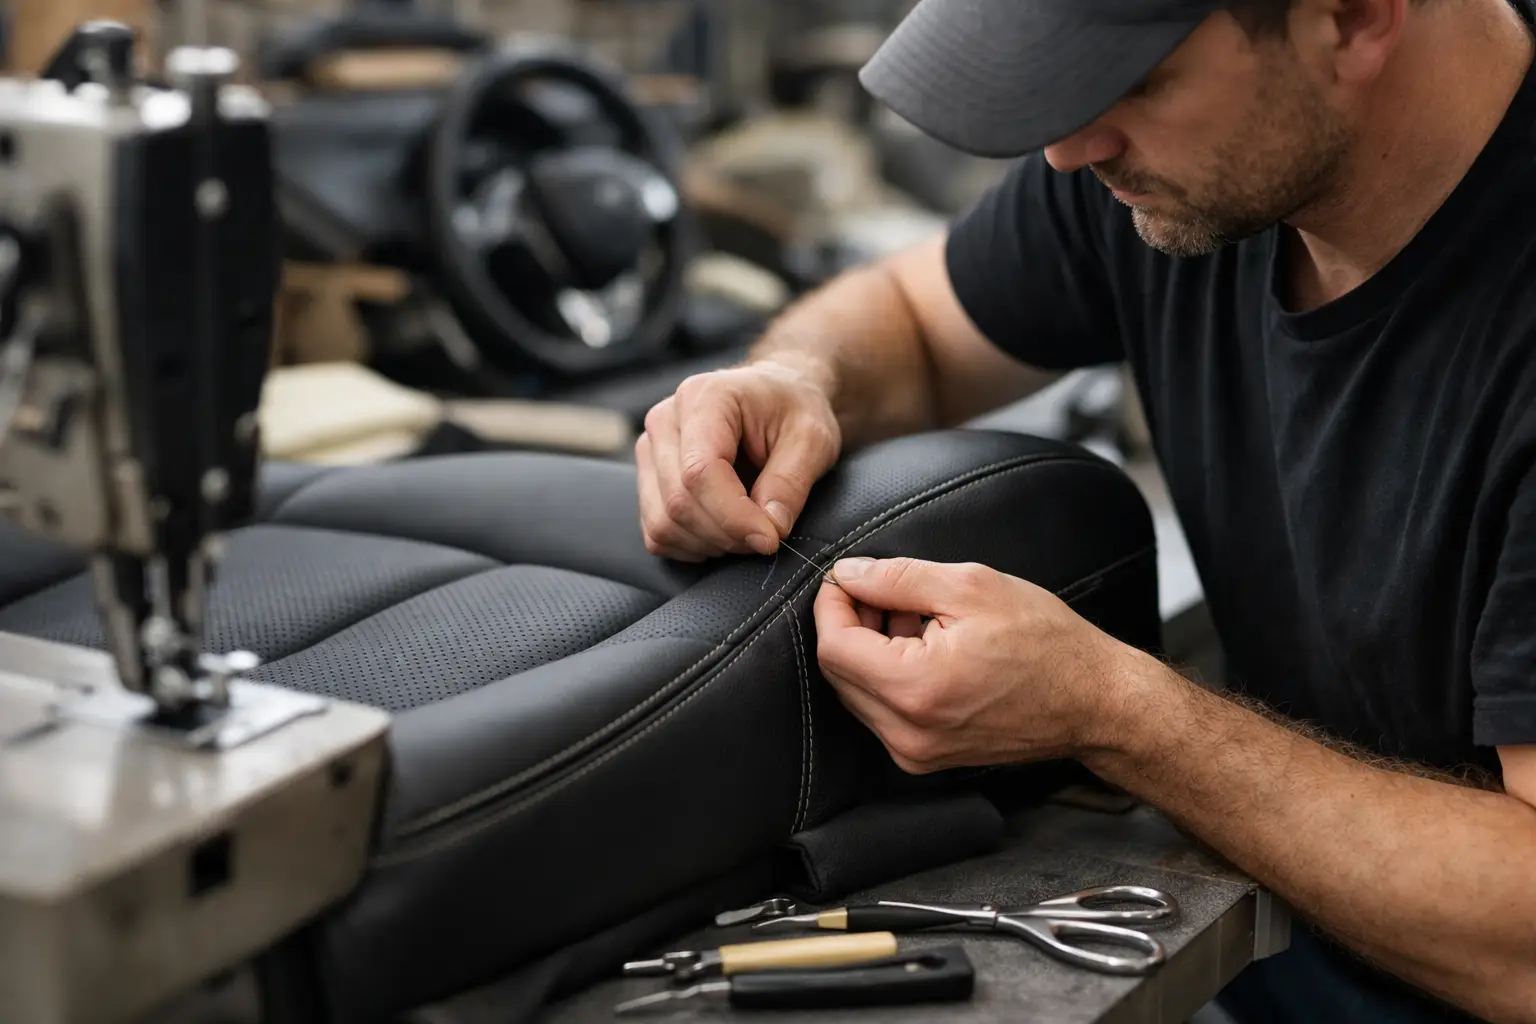
Many beginners are drawn to custom work first. Quilted inserts, contrast stitching and dramatic colour changes are visually appealing, but they are not where sound training should begin. Start with factory-style repairs and straightforward replacements. A simple seat base panel or door insert will teach more useful fundamentals than an ambitious full custom interior done too early.
You need to learn how covers are removed without damaging frames or clips, how old material was cut, where relief cuts were used, and how seams shape the finished panel. When you strip an old seat carefully, it becomes a lesson in construction. When you tear it apart in a hurry, you lose that lesson.
This is where patience separates hobby work from trade work. Good trimmers are methodical. They label components, photograph assemblies, store removed parts properly and keep their patterns accurate. The workbench habits are part of the craft, not separate from it.
Learn materials before you buy tools in bulk
People often focus on machines first, but material knowledge is just as important. Vinyl, automotive leather, foam-backed fabric, headlining cloth and scrim foam all behave differently under tension, heat and stitching. Some materials stretch more across the grain than along it. Some mark easily. Some look suitable on a shelf but do not belong in a vehicle cabin.
If you want to learn properly, handle materials in person where possible. Feel the backing, check thickness, test flexibility and understand intended use. A door card insert and a seat bolster do not need the same performance characteristics. A roof lining material needs the right foam backing and adhesive compatibility. Convertible work is another category altogether, with stricter demands around fit, weather resistance and installation accuracy.
Beginners who ignore this usually blame themselves for poor results when the material itself was wrong for the job. That is why careful selection matters.
Build a small, disciplined tool kit
You do not need a workshop full of equipment on day one, but you do need the correct basics. A capable sewing machine for upholstery weight material matters. So do proper scissors, hog ring pliers, trimming tools, chalk, a heat gun used with restraint, suitable adhesives and measuring tools.
The key point is not quantity. It is control. Cheap tools create inconsistent cuts, weak fastening and frustration. At the same time, buying specialist equipment before you understand its purpose is not efficient. Start with the tools needed for entry-level trim jobs and add only as your work becomes more demanding.
The best way to practise automotive upholstery
The best practice pieces are old components with manageable complexity. Remove a worn headrest cover, a basic seat insert or a simple armrest cover and study how it was assembled. Use that original part as your pattern reference. This teaches proportion, seam allowance and orientation far better than guessing from scratch.
Repeat the same type of job more than once. Repetition is where your hands begin to understand the material. Your first seam may wander. Your second may pucker less. By the fifth attempt, you start noticing how tension changes the finish and why alignment marks matter.
Do not judge progress only by appearance from two metres away. Turn the part over. Inspect the seam consistency. Check whether the foam sits evenly. Press on the surface and see whether wrinkles move. Refit the piece and assess how it behaves once installed. A trim part that looks neat on the bench can still fit poorly in the car.
Use training sources carefully
There are useful books, videos and short courses available, but not all instruction is equal. Some content is made to entertain rather than teach. Fast edits can hide the difficult parts – correcting pattern errors, easing material around corners, dealing with listing wires, or stripping failed adhesive without damaging the substrate.
Look for training that explains process, not just outcome. You want to know why a seam is placed in a certain line, why the material is pulled in a certain order, and why one adhesive is used over another. That level of explanation helps you build judgement, which matters far more than copying one project.
If you can observe experienced trim work in a real workshop setting, even briefly, that is often more valuable than hours of polished online content. You see the pace, the preparation and the attention to small details that finished photos never show.
Expect mistakes, but make them on the right jobs
There is no clean way to learn a hand trade without making errors. The practical question is where those errors happen. It is sensible to practise on scrap panels, donor seats or non-critical trim before touching a vehicle you value. That protects both your confidence and the car.
Some mistakes are useful. A crooked stitch line teaches control. A badly glued headlining teaches preparation and adhesive timing. A loose cover teaches pattern accuracy. But some mistakes are costly enough that they should not be your learning ground. Airbag-equipped seats, premium leather interiors, classic trim pieces with limited replacement options, and convertible roof systems are better left to trained specialists unless you already have substantial experience.
That is not gatekeeping. It is recognising that certain jobs carry too much risk for trial and error. A poor result is not only cosmetic. It can affect safety systems, weather sealing, long-term durability and vehicle value.
When formal learning makes sense
If you are serious about developing beyond basic repairs, structured instruction helps. A proper course can shorten the trial-and-error stage because it teaches sequence, machine handling, material behaviour and fitting logic in a disciplined way. That matters if your goal is not just to patch one seat but to become consistently competent.
Still, formal learning is not a magic fix. You improve by combining instruction with bench time. The hands need practice. Your eye needs training. Your judgement develops slowly, especially when dealing with ageing interiors where underlying foam, frame shape and previous repairs all affect the final result.
For many vehicle owners, the real value in learning is not to become a full-time trimmer. It is to understand the work well enough to maintain expectations, care for interiors properly, and recognise when a job needs a specialist workshop. That is a useful outcome in itself.
Know the line between learning and risking the car
A sensible learner knows when to stop. Minor repairs and basic retrimming jobs can teach a great deal. But if a project involves major seat reconstruction, restoration-grade fit and finish, convertible tops, or rare interior parts, professional handling is often the more economical decision in the long run.
That is especially true when workmanship affects resale value or originality. In specialist environments such as 8 Cushion, the difference is not only better tools. It is the in-house process, controlled fitting standards and material judgement built through repeated real-world work.
If you want to learn automotive upholstery, treat it as a craft worth respecting. Start small, study construction, practise patiently and pay close attention to fit, tension and finish. The skill comes gradually, and that is exactly why good trim work still stands out. The more carefully you learn, the more likely your vehicle will show the result for the right reasons.
Related posts

How to Clean Fabric Convertible Tops Properly
Learn how to clean fabric convertible tops without causing stains, fading or wat
Windscreen Repair Versus Replacement Guide
A practical windscreen repair versus replacement guide for Singapore drivers - w

7 Signs Your Convertible Roof Needs Replacement
Learn the signs your convertible roof needs replacement, from leaks and noise to